Wednesday, February 28, 2007

Inking done!

I've got the ink part of the cherub quilt done. Today I put the blue shadows in the vines, did the purples and reds, and pushed all the really dark navy shadows into the figures.

I love these inks! They have a wonderful transparent quality that makes the figures really glow. The colours are true, too, not muddy.


Now I have to mark for the background latticework, then I can get to stitching!


I've included a couple of photos here for comparison:
These are pictures of the last cherub in the line... one with the dark blue shadows, and one without. It's amazing how the dark contrast just 'pops' the figure into 3dimensions. You may not be able to see it very well on the thumbnails, but if you click on the photos you will get a 600 pixel wide photo to look at. I hope the colours show well on your monitor. On mine they are very close to the original.


Also included for your enjoyment is one of my favorite parts of this quilt as it is developing - the lower right corner. There's a little rabbit making a quick getaway, along with my favorite piece of vine and leaf. It might be because it's so much bigger, but the blending worked here the best of any single area on the piece, has the best shadow/light quality.


I have to decide on a title overnight...I'm thinking "Bacchanalia"? It seems to suit the carefree mischievousness of the Cherubs.

My entry has to be postmarked tomorrow - so I'd better decide tonight!

Happy stitching (or whatever it is that you do)

:)
Lisa

Tuesday, February 27, 2007

Next...


Here is the next wash. Those pesky little cherubs are starting to take shape. Many more washes to go, and I must finish soon if I want to send a photo for quilt show deadline. Not tonight, though. I'm pooped.
Tomorrow seems like the last day to do everything. Why do we insist on making the last day of the shortest month the deadline for so many things? Is it that we think we should finally be recovered from Christmas and New Years, so should be able to have things done by now? I don't know. It seems like a large load for such a small month. It could use a few extra days.
If someone out there ever invents the 30 hour day, I'd be interested. Maybe we could use the extra hours for sleeping...
yawn...
L

Still winter


Ol' Jack Frost still has us in his grasp...this morning on the way out to go to school, my youngest son and I discovered that everything was covered in this beautiful, hairy frost.

Because it was a Roots of Empathy day and our class baby was coming to visit, I had the camera in my bag. I snapped a few photos of the frost right then...it's a good thing, too, as by the time I got home all the frost was gone. On the flip side, it was beautiful and sunny by then, something we don't often get in this valley in the winter.

Today I'll be adding some more layers of colour to the Cherub quilt, and will post pictures later.

'till next time,

Lisa

Monday, February 26, 2007

Cherubs, continued


Today I managed to get the full quilt traced onto fabric, then started the inking process. I have another piece of fabric waiting in the wings in case disaster strikes! This is a bit of a nail biting process, as each thing added to the fabric is permanent...I know the dyes are water soluble until heat set, but it's really hard to lift just a tiny area if something goes wrong...or to just heat set what's going right, then throw the whole works in the washer to see if the bad stuff comes out.
So far I've done the initial two washes (banana and apricot) placing in the highlights and the beginning of the shadows. I have to admit I quite like doing those first two washes, they are when line drawing moves into the background and more 3dimensional work begins to emerge.

The last wash of the night was the most heart stopping so far, though, as it was GREEN. Just touching the paintstick to the fabric feels like asking for trouble! Every mark shows. The amazing thing about these little paintsticks (Fantastix, my preference is the brush tip) is that they don't drip! The stand for the dyes is really stable, too, so I don't worry about knocking over the little bottles.
Once I got going, though, it was a ton of fun. As it turns out you can give this a really authentic watercolour feel by dry brushing the dye in (on top of the previous washes), wetting it with a stiff brush - I kind of 'scrubbed' the water in - then placing a paper towel and iron on top of it to both lift some of the dye and stop it from bleeding as it blends...all while heat setting it. It's a bit of a 'found' method, as there's no real way to know how it's going to look until removing the iron and paper towel, but colour can be built up in reasonably controllable layers this way.
Ah! Many colour layers yet to go, and I MUST get some sleep yet as tomorrow is the day I work over at the Elementary School doing the Roots of Empathy classes.
It's hard to walk away from, but I must. Next are the purples, the browns and blues...NOW we're going to see some dimension.
Sweet dreams,
Lisa

Back in the saddle


I'm doing much better now - thanks for all the sweet well-wishes, both here on the blog and privately. It made a big difference!


After crawling out of bed on Saturday I managed to have a really productive weekend - good thing, too, because I was getting behind on several things. That's the thing about being self-employed: there just isn't any pinch hitter to call in when things get tough.

Here are a couple of pictures of one of the quilts that I finished this weekend for a customer. She (like me) is a fan of double batting. This quilt was done with Hobbes Cotton batting as foundation, then Hobbes Wool on top. It is quilted with one of my own designs, Trellis Vine. I think it really complements this top, and adds a lovely diagonal movement to the texture.


As you see it is really quite big! I've taken to hanging quilts sideways on my stand - they seem to fit better that way, to sit less on the floor.

(***later edit*** I have no idea where this photo went!***)
Last night I spent some quality time finalizing my Cherub quilt drawing. I'm finally at the stage where I can break out the inks and start painting this up (the fabric is in the dryer as we speak...the iron is getting hot). I may yet change a couple of the details, but not many at this stage. I know there is a lot of open, 'negative' space in the lower left of this final drawing, but I wanted to 'hang' the grapevine on a structure and needed an area that would establish that structure so that it would make sense behind the cherubs and vine. That area will be quilted in a trellis pattern, done sole-ly with thread. I'm hoping that will give a bit more depth to the whole piece.


I'll probably move that little rabbit (I love the rabbit) down to the lower right corner, more, and remove or change any of the leaves that are upside down. In the original stonework there were upside-down leaves, but I can't seem to get comfortable with them...my grapevines in the back yard just don't grow like that. You may also notice that I've redrawn all the leaves to make them a little simpler, and much more 'grape-y'. The whole works has undergone quite a big change, and is starting to feel like it's going to work.


O - the dryer just shut off... Time to start tracing!


Hope you are well wherever you are,


Lisa

Friday, February 23, 2007

Sick, but getting better


It's my first venture out of bed since Monday evening...I managed to 'catch' whatever it is that the boys have been struggling with over the past weeks. Thanks to everyone who checked in in the interim, sorry that there has been nothing new for you.

This afternoon I saw over at Willow Leaf Studio that Jodi has released my newest Panto, Deco Rose. Hope you like it.


Happy stitching,


Lisa
**later edit** - it appears that Deco Rose has also been released in digital format, as well. Cheers!
L

Saturday, February 17, 2007

Martin gets hair

We finished Martin last weekend, but didn't manage to get any hair on him. We made him a toque to wear to school, but looking at him...well, you see what I mean.

Oldest is sick. He's got a terrible fever. Consequently we've not been out and about the way we usually are and I got some time to get going on finishing Martin up.

We started with wool (acrylic) that Oldest chose the colour of. I wrapped it on a piece of cardboard that was 1.5" X 12". I tried to keep the wraps relatively even, and NOT stretch the yarn as it went around the card. If the yarn is stretched at this stage, it will shrink up and not be all the same length once cut.

Once the cardboard was wrapped along it's full length, I stitched along the edge of it with my sewing machine using a blind hem foot, with the needle position moved over to the left a little. The goal was to stitch through each of the yarn wraps. I shortened the stitch length, too, just to be sure.

Once everything is firmly stitched, I cut through the wraps along the opposite edge to the one stitched. This gives a kind of mini feather boa-like fringe. For those of us born at the beginning of the '70's, it reminds us a little of carpets that we learned to crawl on...

I made about 8 of these little boa fringes, but in the end only ended up using 6.

The next bit was fun. Starting at Martin's crown, I stitched the fringes to his head in a spiral pattern. If I'd had my head screwed on tight I would have drawn a hairline guide right on his head before I began. Once I got stitching around in circles things got a little lopsided...the good news is that the lopsidedness was solved by just adding more fringe!

This is a point where you can stitch the fringes as close together or far apart as you want. I placed these ones about a 1/4" apart, closer at the crown. I didn't want anyone to be able to see any of the fabric through the 'hair'.

And so, Martin is ready. Not for his debut, as he has been telling jokes and doing some disco dancing ever since his arms and legs were attached. Ready, perhaps, for his close-up, Mr.Demille!

Now, once Oldest is feeling better, he'll have us all in stitches!

Have a great weekend,

Lisa

Thursday, February 15, 2007

Photo quilt freezer paper method


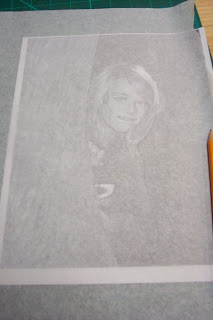
Choose a photo with high contrast. Enlarge it to the size you think you'd like to work with. It might be a good idea to make it larger than you think at first, and plan on making more than one. The first draft might be a throw away - use it as a learning experience! You might not be totally happy with your first try, but don't let that turn you off the process.
I usually photocopy it into gray scale at this point, as it makes the tracing step easier.

Use some tracing paper to trace your photo. Try to make shapes that enclose the light, medium and dark shapes. Don't try to be a great artist, don't bother trying to draw the picture the way you think it should look, just follow the edge of the different spaces. Trust me, it will work out.

Once you trace it, darken your trace with marker. Photocopy it once more onto regular paper.

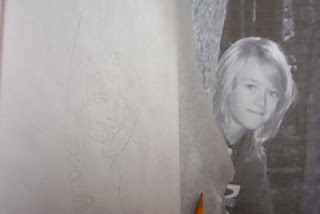
Lay your tracing paper copy back on top of your photo. Use it as reference for the next step.
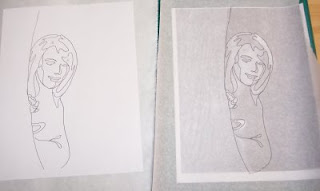
Look at the tracing paper - you can see the light, dark and medium shapes through the tracing paper layer. Mark a little notation on each of the shapes that you made (on the regular paper photocopy) as to whether you want to make the shape out of light, medium or dark fabric.

Once you have this 'key', keep it intact. Photocopy it once more on to freezer paper. It's important to make sure that those notations are on the freezer paper copy! The freezer paper copy is the one you need to cut apart, but not quite yet.

Go to your fabric collection and figure out what you want to do for your background. In the case of the photo above, I'll probably lay down a background piece for the right hand side, assemble all my portrait pieces on that, then add the left hand side (in the original photo, Oldest is peeking out from a large tree {Hi Mom!}). Adding the tree layer at the end will add to the illusion of depth.

Once you have your background piece figured out, you can start looking at your portrait again. Each of the shapes on your freezer paper copy should be marked either light, medium or dark. Again, it is the freezer paper copy that you can cut apart...save the plain paper copy for reference.

Go back to your fabric collection and pick out the fabrics you want to use. For portraits it's usually good to use mottled solids or solids in the skin areas, although there have been amazing successful portraits using wild and wonderful prints. If you're going for realism, use calm fabrics. If you're going for interpretive portraiture go for colour!

Looking at your photocopy, choose your lights, mediums and darks of each colour. I usually apply Steam-A-Seam2 (SAS2) to the back of any of the fabrics I think I'll use. Then you can cut apart your freezer paper copy, iron the freezer paper waxy side down on to the right side of your portrait fabric. - Don't forget to keep the paper backing on your SAS2, or you'll have ironed your portrait fabric to your ironing board (ask me how I know...)!

Cut out your portrait fabric around the freezer paper shapes. Remove the paper backing and freezer paper. Once you have everything cut out, go back over to your background fabric and start laying your pieces down. If you're having trouble getting it all to make sense, take your tracing paper copy and lay it on top of your work. You should be able to see through the tracing paper and figure out what pieces are not quite in the right place. - By the way, don't do this next to an open window - any light breeze at this point will blow all your work on to the floor!

Nudge all your pieces into their right place, stand back and decide if the colours work the way you wanted them to. This is your last chance to change your fabrics! If you want to replace any of the colours, go ahead and do it.

Once everything is the way you want it, grab a Teflon pressing sheet or a large piece of SAS2 backing paper. Gently place it on top of your assembled portrait, then (following the SAS2 manufacturer's directions), press everything to fuse it. This step is permanent. Once things are fused, you can not change them... this is why it's nice to start two at the same time.

Now that your fabrics are all together, embellish, embroider and quilt at will! Have fun with this. If you have any questions about it, you can email me privately and I'll be happy to help straighten things out. If you use my method, please send me a photo of your finished quilt! I'd really love to see it!

Most of all, have fun.
Happy stitching,

Lisa

Today's work


Here's the quilt I've been spending my day on. It belongs to my husband's Aunt. She had a set of blocks, a block layout, and asked if I'd put it together and quilt it. This is how it's coming together.

It's at my favorite stage (the quilting, surprise, surprise!). I'm treating it rather traditionally, and am loving it. I haven't done one like this in a long time. The star blocks are getting a continuous curve treatment, and the open blocks are getting lovely feathered wreaths. The border has a partial undulating feather with parallel lines going from centre to outer edge.

I was talking to some ladies today and promised a tutorial on how to convert a photo to a quilt pattern...for making portrait quilts. I've done the preliminary work for putting a tutorial together (taken a bunch of photos of the process) and will continue to put it together. I'll just not be posting it today, as I'd originally intended - SORRY! I'll keep putting it together and will post it all here once it's done.

Happy Stitching,

Lisa

Wednesday, February 14, 2007

Creativity Exercises 6

Today I downloaded a trial version of Corel Paint X - it's a larger version of the Corel program that I have here (Essentials, I think?) that I normally use for my digital drawings...uh,oh. It's awesome. It's got all the things that I already like about the small version, just with waaaaaay more tools, types of paper surface, etc., etc., etc. This was my 15 minute drawing exercise today - a silly closeup portrait of Youngest from a photo taken of him while he was listening to music.

The illustration Friday challenge this week is 'crash'...I have a few ideas for it, but haven't sat down to make them happen. The Cherub quilt is really on my illustration mind right now. I think the final border ideas are worked out (well, thumbnails look right!), so the next step is to do a large scale drawing. - Hopefully later tonight.

Tomorrow is my publisher's deadline for anything being released specifically for MQX. I submitted my big project about 2 weeks ago, and am totally excited about it. I'll be accompanying Jodi to the show this year in April, and am so revved up I can hardly wait. I've never been to a really big show like that before! I am looking forward working in the Willow Leaf Studio booth and hopefully meeting many of the people that I correspond with via computer. If you're going to be at the show, take a minute to drop me a line. I'd love to meet you.

Back to stitching!

Lisa

Sunday, February 11, 2007

Our weekend project

This weekend was our Oldest Son's first ever hockey tournament. It was an absolute blast to watch him play with all his friends! We had teams here from Castlegar, Revelstoke and Salmon Arm. He was really proud of how he played, and so were all of us.

One of his passions lately has been ventriloquism. He's been trying to figure out how he can afford a 'vent' puppet - the ones he's been looking at have been upwards of $300! Knowing that he won't be able to afford anything like that soon, we set out to make a puppet he has named Martin.

He was as involved in the process as he could be - some of it was a little complicated! He discovered that he really likes using the iron.

We started out with a doll body pattern enlarged it by 50%, and modified the neck and head to have the puppet parts it needed. Our son can put his hand in at the middle of Martin's back push up into his head to work his mouth hand-puppet style. We realized pretty early on that Martin was going to be pretty BIG!

After making a baby quilt last week he has become pretty handy with the sewing machine. Here he is stitching between Martin's fingers. Martin's arms aren't actually attached yet, contrary to how it looks in the picture.

Here's a final shot of Oldest boy and Martin with features drawn in, but no hair yet - we made him a toque (how Canadian is that) so that he can go to school.
Martin has had dinner with us tonight, and helped Oldest with his spelling and reading homework. He also observed a bath (electing not to join in).
Martin is big enough to fit into some of our Youngest son's recently too-small-clothes. We didn't have to build him a wardrobe, but we are going to have to do something about that lack of hair. My DH suggested that Oldest give Martin some of his, but Oldest said,"no way, I'm not ready to cut it yet!"
Back to quilting tomorrow, once all the boys are back at school.
Happy stitching!
Lisa

Saturday, February 10, 2007

Inclined to Bind

Like many people I've been talking to lately I've finally caught fire for finishing! Here is the stack of binding I have pending. The first couple of hours this morning have been spent applying binding to all the big and small quilts I have around here that needed it, now the hand stitching begins!

At our quilt meeting last week I brought another stack (all little ones) that needed just the hand stitching done. We got to talking about how hard it is to finish, why we don't just take those last steps, and the reasons why various projects get put aside. It was really interesting, as absolutely everyone had something lurking somewhere in a closet or under the bed that needed finishing. One of the ladies there said,"Obviously, Lisa doesn't like doing binding." I thought about it, and realized that she's right. I don't like this last step. Not so much the binding, but the hand stitching for the sleeve. One thing all the quilts in today's photo (and the ones I took to group last week) have in common is a hanging sleeve. I've got to be really, really disciplined to sit and stitch that sleeve. I can brew several pots of tea and fold lots and lots of laundry while procrastinating that short (often not more than 20 or 30") stretch of seam.
So. Without really intending to, I've made a bit of a promise to myself to finish a lot of what has been started here.
(and yes, you can see some Christmas fabrics peeking out in the pile above. - Hey, my gifts are going to be ready for NEXT year, right?!?)

Happy Saturday,

Lisa

Friday, February 09, 2007

I just noticed


I was over at DigiQuilter just now and saw that Jodi's released two more of my designs in digital format... Arabia and Cumulus.
You can see them here.
Happy Stitching,

Lisa

Customer Quilt

This is the quilt that I took off the machine last night - for those who love scraps, this is an extravaganza! She used all kinds of pieces from her stash and scrap pile, bringing it all together with purple fan centres and a warm white background. Using the repetitive block placement just accentuates the fun variety of the scraps in each block. Trust me, there's lots for a fabric lover to look at here!

I hope to get it back to her today.

Working on this quilt got me to thinking...I have a big stack of fan blades already cut out from my scraps. It's a project that I set aside as I was having trouble seeing the unity of design in it - it just didn't seem to be 'coming together'. After working on this scrappy beauty I've pulled out all those fan blades (280!!), enough to make 56 blocks. They aren't as diverse as I remembered, with the blades being mostly in the cool end of the colour register with a couple of warm reds and purples thrown in for fun. Thanks to this scrappy beauty, I'll be moving forward on one of my own UFOs.

For those who are following the cherub quilt: I've redesigned the borders (again) and hope to get the drawings completed this weekend. That quilt has a deadline for show entry that I don't really want to miss. I've not entered a quilt for competition in 5 years (of my own, that is. Many customer quilts have competed around the province).
Stay tuned!

Lisa

Monday, February 05, 2007

Hummingbirds - quilted at last!

This has been a long time coming. For those who've been following this blog for a while...it's finally quilted!


This was a tough one to do - I was putting it off, imagining different quilting treatments, thinking of this, of that, when all I had to do was put it on the machine and start quilting.


Once I got going, everything seemed to fall into place. I had the right colours of thread (o happy day) and the machine is running beautifully. Since upgrading to the new APQS foot I've found that there I've got so much more control while using templates...which comes in handy for stitch-in-the-ditch.


Most of this quilt was done freehand. I only used templates for a few little picky parts (around the Hummers). My current favorite templates are the Sew Clear MiniCurve and the Sew Clear MiniTri! They're what I've been using with the art quilts as well.

Originally, there were to be Angelina Fibres on this one, in the flowers, but they just didn't look right with the rest of the piece. I may still add a couple of beads, here and there, but I think that'll be it for embellishments.

Please pardon how dark the photos of the bottom of the quilt are...I don't know how to get the light to be even enough to make that part of the quilt show it's actual colours. The top part of the quilt is actually as light as it looks in the picture, The fabrics have a subtle gradation that gives a bit of an optical illusion in photos.


So, now the binding... what colour?

Lisa

Back to the drawing board...quite literally

I took a swing a stitching up a section of the border I posted yesterday, and it's officially a no-go. Several problems presented themselves, and there's no recourse but to design a new border. I've been looking more at renaissance border treatment, and think that I'll probably end up going with something more organic again, but hung on a geometric framework. Perhaps grape and acanthus leaves in arabesques? Too bad. I liked how that one looked in the mock-up.
This morning I'll be putting a lovely big customer quilt on the machine. All scrappy fans.
Happy stitching,

Lisa

Sunday, February 04, 2007

The next stage for the Cherubs

I finally decided to enlarge the cherubs. The only way to do it in the end was to trace the original drawing, cut it up into scanner-bed friendly pieces, enlarge it, and put it back together. The new piece is 50% bigger - it looks much better.
Now I'm working out my borders.

This is taking a lot of "hmmmmm" time. The original plan was to place the cherub panel in an architectural context, with a pillar form above or below it...but I can't seem to get that to work. I'm going to go with this border, I think. It's from the same period (Renaissance), but not necessarily the same country. Sadly, my book source for the cherubs does not list it's actual origin, just it's ballpark age. I've been hunting around in all my art history resources, but to no avail.

Anyhoo, I think the wrapped border works well with it, adds a very geometric element to the whole piece. I've traced a small section of border onto my tester fabric, and in about 5 minutes will start inking it in. If I can decide what colours to work with, that is. What's with this indecision today?

Hope your path is always clear,

Lisa

Saturday, February 03, 2007

A thought I had today

Sometimes the hard part is not following your muse, it's finding her in the first place.

L

Friday, February 02, 2007

Cherubs - testing, testing part two


Here is the next installment...
I know, I couldn't leave well enough alone and had to fill in the background with ink. I'm not sure whether that was good or bad...as always, you're welcome to weigh in with your opinions in the comments.
Happy Friday,
Lisa

Thursday, February 01, 2007

It's official, I'm obsessed!

Yup, it's official. I can't stop goofing around with this stuff! I had to try out the snake motif on the machine. It's sort of the 'canary in the mine', and I wanted to see if the techniques that I've been hoping to do have any potential to make sense visually.
The first photo here shows a little bit of my machine handle in the way - it gives a sense of scale...this is really not a very big painting I'm working on. Also, it shows that the piece was built at a 90 degree angle to the finished viewing angle.

The first photo is of beginning the actual snake. I started with a WonderFil Rayon variegated - it's lost in the photo here, but it has beautiful lustre. The colours in the thread are all blue/green/turquoise, much like the snake. I have to admit I was a little disappointed in the colours of the snake at first - I thought they'd be more luminous somehow. Then reality hit - I'm working on COTTON here, not silk.
This whole first stage was really nerve wracking and more than once I was sure that I'd ruined everything.

Once the snakes themselves were done, I got going on the black right away (also a WonderFil, this one Silco black, cotton, but with the lustre I was hoping for from the dyes). Things started looking more defined - BUT every wobble in my lines showed! There's no subtle way to do black, I guess.

The last photo is of the finished piece. At least I thought it was finished until my 7 year old said, "Mom, you should have done their tongues red!" Yup. Smart kid. Here all this time I was seeing those oral protuberances as fangs. They really are tongues. Now I'm debating getting the dye out again, to see about colouring them up.

Hmm. Maybe I should sleep on it.

Happy stitching,

Lisa

Cherubs - testing, testing

Here's how it's going. I'm still doing testers of this whole experience with the Tsukineko inks, and thought rather than arbitrarily decide if I need to make the cherubs larger, I'd try painting one up at the size they are currently to see if it will work.
The first photo is of the initial yellow and apricot colour washes.

The whole thing is almost non-existent at this stage, but I thought I should record them for posterity (and later when I think...how the heck did this go together?).
The second photo is the sepia wash... I like how things start to take shape here. I did a lot of really dry work at this stage, mostly with the brush point Fantastix.
There were a couple of spots with a bit of uncontrolled dye travel, but not too bad!
The next photos are of three consecutive washes...somehow I lost one of the photos in all the transfers. After the sepia I did a light orchid wash to try to set my figure into a bit of background. This was followed with a darker wisteria coloured wash to push in some nice dark areas and give the figure some contrast.

The second last photo is once the dark (almost an ultramarine blue) was touched in - this is when things started feeling really good to me! I love that warm/cool tension. I played around with different background colours off at the edge of the fabric, thinking I'd fill the whole works in and have a large stitching area to work in for the next step, but everything seemed far too strong in colour - or too garish.

I was pleasantly surprised that the white that was included in the set that I got was really nice and light, yet opaque enough to be used for highlights. The final picture is of the piece as it sits right now on my ironing board. The highlights are subtle, but they do help a little.


As with yesterday, I saved larger photos so that anyone wanting a close up can click on the picture to enlarge it. You may not want to if you have a slow connection, though!

One of the hardest things is trying not to 'overwork' the image...that's partly why I didn't end up putting any background in. The goal is for a natural image, not one that is opaque and over painted. When the dyestix are in my hand it can be really hard to know when to stop!

The white 'dye' was nice enough that I went back into the snake painting from yesterday and painted over some of the really big colour bleed areas. I'm looking forward to the stitching stage on both of these, now, as the hand of the fabric has not been affected by the dye process, and it'll be neat to see how they stitch up.

Happy stitching,
Lisa