Showing posts with label tutorial. Show all posts

Tuesday, January 11, 2011

another thing to do with fleece

One of the things I got up to last weekend with the fleece was making felted soaps.  It's really very easy and low tech...and the results are so worth it.


Why felt soap?
Gentle exfoliation.
Subtle, natural antibiotic properties of fleece.
Regular contact with wool ;)

There is a wonderful soapary (is that a word) up the Valley from us - Mountain Sky.  The greengrocer down the hill from us carries end cuts (or off cuts) of this lovely soap in a big bulk bin.  The pieces can all be different kinds, and non-standard sizes, but are always first-rate quality.  I had a bag of these in the cupboard that I used for my project.

It's very simple.
Have ready some rolags or combed fleece, a sushi mat (or washboard), some chunks of nylon stocking, a towel, soap and a drying rack.

Wrap the soap in fleece, making sure that all the corners are covered, and that there are no thin spots.

 Stretch the chunk of nylon stocking over the wrapped soap carefully, to not shift the fuzzy fibre coating.  Because I was doing several, I did each step to all the soaps, production style.

The picture at left is a bit decieving...the nylon stocking is only tied at one end.  It's twisted and tucked underneath at the other.  If you tie both ends of the stocking, you'll have to cut the stocking to get the soap out...and eventually your stocking pieces won't be big enough to do anymore soap!

Dribble a bit of dishsoap on the nylon-wrapped bundle, then dribble some hot water on it.  Start rubbing it in your hands...you can be pretty vigorous!  If it feels too dry at first, add more water until it's all frothy and foamy (you don't want it dripping wet).

Rub it on the sushi mat (or another ribbed surface) to speed along the felting process.  Make sure that you rub each edge, end and flat plane of the soap.  When it starts to feel like all the fleece has compressed evenly, you can slide it out of the stocking.

Keep rubbing it in your hands and on the sushi mat until the fibre is completely compressed and not loose around the soap anywhere.  Rinse it in the sink, roll it in the towel to blot out most of the water, then set it on the drying rack to dry. Et Voila!  Finished!

I made about 8 of them for gifts.  It's got me thinking about other things that I could felt. Hmmmm.


:)
Lisa

Thursday, December 30, 2010

As the year closes

 The last couple of months I've been rolling around an idea in my head. Well, okay, more than one idea...but this one is about my day planner.For the last several years I have bought the same planner - and loved it.  It has room for all the things I need, and more.  It's the 'and more' part that got me thinking. Much as I appreciate the organizational brilliance of these books, I rarely use the family profile pages, note pages or contact pages (except as grocery list paper).   After all these years of planner use (at least 20), I know what I need from a planner.  


So, typical of my personality, I decided to make one myself.  
After surfing the web looking at endless templates that weren't quite right, I decided to draw my own. Rather than attempt to print out all the pages from my computer in the proper order, double side them accurately and collate them, I opted to buy an existing book and play with some ideas.

The things I liked about the purchased planner were the hard cover and the coil binding (can't beat a book that will lie flat!), so I bought a 5.5 X 8" sketchbook and made a stencil template to rule the pages.  There were a bunch of letter and number stamps kicking around a drawer upstairs begging to be put to good use, so I employed them as my typeface.

It probably took me about 4 hours to print up (to be honest, 2 of those hours were spent watching a spaghetti western movie with my husband, and the other two listening to a Jeffrey Archer book while printing).  I learned a LOT in the process (for example, mounted stamps are far easier to handle than unmounted ones...it took until about June to figure that out!).  My later pages are far prettier than my earlier ones, but that is to be expected, isn't it?

And here, my final picture of my sample page, will not load the way it should!!  This is my 3rd try to get this particular picture to load...and it will remain rotated, as I can not get it to go any other way.

It made most sense to put the month on the right page.  My weeks are all Mon - Friday on the left, the weekend on the right.  The lower right divided area is for 'to do' lists, and telephone messages.
My planner tends to spend most of it's life on the kitchen counter being consulted daily for meal planning and open for use and referral by other family members, so the loosely divided space on the lower right doesn't get formal designation...

It's hard to see in the picture, but I've put big gold stamps on family birthdays (Youngest's is Sept 29, shown at left).

 After all the stamping was done, I added some expandable pockets for receipts, etc. The whole works is sitting under a pile of books upstairs while the glue dries.  Tomorrow I begin the adventure of writing in all the different things we have already lined up for the coming year...not the least of which involves speed skating.

It's silly, but every year I have the same satisfaction with closing the previous year's planner, and opening the new year's one.  As we get older there are fewer milestones - and the ones we have tend to get further and further apart.  There's something about the ritual of literally closing the book on one year and opening a fresh new book on the new one that's so appealing.  All those blank pages will be filled with the story of our lives... the literal story, the minutiae. We have the stories we tell about our lives, the love, the memories, but these planners end up being the record of how we get from one day to the next.

Enjoy the rest of the year.  I hope your next year's book is filled with lovely things.

Lisa

Sunday, September 19, 2010

Sunday morning

It's pretty rainy here today...well, it's actually been pretty rainy for a couple of days.  When the weather's like this I have a tendency to get uber-domestic.

Yesterday I made granola (again), and banana bread, and chicken cacciatore from scratch.  The bread that is currently baking in the oven was started last night, too.

The last few days have been good for cleaning up the garden (between - and sometimes during - rain showers).

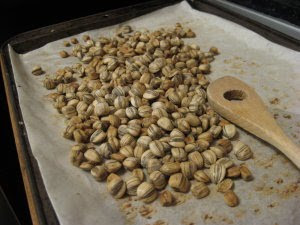
Earlier in the week, before all the rain, I'd set aside this sunflower head so that I could try my hand at toasting seeds.  I figured, "how hard could it be?"

As it turns out, not very hard at all.

I started out by separating the seeds from the head and washing them in the sink.  The seed head was pretty dry, and all the ripe seeds separated by the simple action of rubbing my palm across the flower head. Once they were in the sink, I picked up double handfulls of them and rubbed them against each other to knock off all the garden dust and debris.
They were then left to sit in the sink so that the debris could settle and the seeds float (coincidently, this step corresponded perfectly with the amount of time it took to check my email!).

Because I didn't think to put them in a salt brine last night for today's roasting, I opted to boil them in a brine (5:1 ratio of water:salt) for about 20 minutes.  They're still a little saltier than I'd like, so next time I'd probably do 6 parts water to one part salt.

Once they were boiled, I drained them in the colander, then spread them on a baking sheet for toasting.  They were toasted at a higher temperature (375F) than I normally would have done them - but - I was baking the bread at the same time.

I took them out and stirred them at 10 minute intervals to check on their progress.  I think they were in and out of the oven about 4 times...making the total roasting time about 40 minutes.  It was pretty obvious when they were getting close to done, as the whole house started to smell like roasted seeds.  Mmmmmm.

The inspiration for all this activity was a memory I have of big sunflower heads that Mom and Dad grew on the farm when I was young.  I remember passing those seed heads sitting in the shed, drying, while I fed that cats (I think) each night.  It's funny, the way that memory is, but I don't remember if we ever did anything with them, or if they just eventually ended up in the massive compost area that we had behind the greenhouse.  Either way, the sunflower seeds today are a little tribute to those long-ago sunflowers, to that long-ago garden.

Enjoy the weekend.

Lisa

Wednesday, May 07, 2008

Stitch markers tutorial (photo heavy)

It's been a tremendously long time since I did a tutorial, hasn't it?

I've been using some lovely stitch markers for my knitting, ones that I bought at Hide and Sheep. Today, as I was dozing off, I had a brainwave of how I could make stitch markers myself...I've been missing my big round nose pliers for several months, so have not taken a plunge into doing this, thinking I'd try once I found them again.

I just couldn't wait...and it turned out, there was no reason to.

You can see the basic supplies in the picture at right:
silver wire (half hard, 18 gauge)
Various beads, bead caps and spacers
mandrel
wire cutters
chain nose pliers
round nose pliers (in this case, mini ones)


Start out by making a teeny, tiny loop in one end of your wire with your round nose pliers.


Next, string on your beads. Remember that the first bead you put on will be at the bottom of the stitch marker....


Using your chain nose pliers, make a right angle bend in the wire above the beads. Notice in the photo that I'm just holding the wire with the pliers and making the bend ABOVE the jaws of the pliers. This is important, as you want to have room to work later, and this builds in a little space.


Next, still holding the right angle above the beads in your pliers, wind the wire around your mandrel. This will give you the round top that your knitting needle will go through later, so make sure it's big enough to accommodate your favorite needle size. You'll notice in the picture that I'm holding the mini chain-nose pliers in my right hand underneath the mandrel. I want the loop to be as close to the right angle as I can get it.


Now, hold the loop in your chain nose pliers. wind the tail of the wire around that space you made below the right angle (trust me, doing it is so much easier than trying to explain it). Wind it around and around, keeping the wraps tight, until you run out of space. Use your wire cutters to cut off any excess wire flush with the wraps. If you leave anything sticking out here, it will get hooked up in your knitting! You can always use those chain nose pliers to force any 'stick-out'y bits into submission.

Et Voila! You have a stitch marker!


And you know me, I can never make just one....


Or just one variation, for that matter. The next set were done using a blown glass bead, bead cap, end, barrel spacer and wire with the same method. I think that's 20 gauge silver though, as I ran out of the 18 gauge.


Oh..and a quick credit to my oldest, who helped take photos of the 'in process' tricky bits above.


Oh, and who are these happy, happy people?

Me and my DH....happy landowners, leaving the lawyer's office. I had to get a snap of us in the first couple of minutes after we signed the final property transfer...after trying to take 3 pictures myself, DH took the picture. Like many things, I should just leave it to him. Really.

:)

Lisa

Sunday, February 03, 2008

Buttony sweater progress - photo heavy post

My evening knitting has been a ferocious thing...I've really been restless and it's been a great way to keep my hands busy while letting me think a little. None of what I'm working on right now is so complicated as to need my undivided attention, and that is a good thing.

I thought I'd share my button process with you. On a sweater like this where some buttons are going to have more stress on them than others I'll re-enforce buttons that fall at stress points (in this case bottom ribbing, bust point and top button). This helps to prevent the button pulling the fabric out of shape at these points.
Typically I start with threading the yarn needle with at least 2 strands of yarn, which I use doubled. This gives me 4 strands of yarn for each pass of the needle. Do yourself a favour before you start and make sure that the yarn can be pulled through the button's holes easily.


To figure out the button placement I usually place my garment on Sally Stitch, adjusting everything to make sure that things hang right and fit well. I pin through the button holes at each point to hold the garment in place while I stitch each button on. The one I'm doing for demonstration is the top button (all the other ones were already done). To start, remove the pin, and lift the stitch directly underneath the buttonhole. Give it a little tug, but not enough to distort the fabric.


Lift the button band away. The stitch that you will be putting the button on will now sit a little proud of the others.


Pass your yarn needle through a small button, then through the fabric back to front where you determined the button should go.


Now pass the yarn through your fashion button, the one that is on the right side of your garment.


Pass the yarn needle back through the fashion button, front to back, making sure that you go through one of the holes on the little backing button, too.


Continue going back and forth in this manner until you have passed yarn through all the button's holes (typically not more that 4 holes). Tie both ends of the yarn together on the back side against the little button securely, trim yarn ends leaving a bit of yarn, not enough to be seen from the front side of the garment, but long enough that your knots won't unravel. You can put a little bit of Fray Check on your knots, if you like.


Pass your button through it's buttonhole to make sure the placement is indeed right.


Here's my Buttony with all 12 buttons on. I'm now ready to pick up the stitches for the arms - I can't decide if I want to just leave them short like that, or knit long sleeves. I'm kind of partial to how it looks right now, and think it would be a really practical thing to wear over a long sleeved jersey knit shirt. And kind of cute, besides.

All the best,

Lisa