Monday, July 20, 2009

Fully fulled - ready for winter...

Well.
Perhaps blogger and I just plain disagree on how photos should be presented.
Perhaps something fundamental has changed in the software since I was a regular blogger.
Perhaps I just have lost my 'touch' for these things.
Regardless, here is the story of fulling my slippers (shown in last post) in reverse order:

Finished!

It's a good thing that I looked into the washing machine when I did, as the slippers were fully fulled to fit my foot. There is absolutely no stitch definition left, and they have a delightfully squishy, nubbly texture. I had given up hope on them by the time I'd thrown them in the washer with a bunch of pairs of jeans for agitation.


The photo above is the penultimate desperation point, when I gave up on being gentle and just went for it with the plunger and HOT water in our bathtub. The slippers were seeming to just stretch at this stage, so I thought I could put them in the washing machine as I had nothing to lose by it.


Here is the cold shock I gave them, hoping to make them start to lose stitch definition - or SOMETHING.


The photo above shows how gently I started. The bucket is filled with crazily hot water and a little bit of mild soap. Having accidently shrunken knitwear before, I thought it best to start with caution. Somehow the idea of abandoning the slippers to the front loader seemed a bit too rash...

At this stage I was still thinking it might be safe to throw DH's new sweater into the washer (these slips are using up a couple of the last skeins from that project). Now I know that would be disasterous.


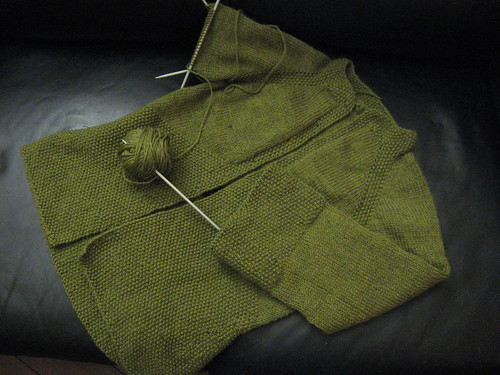
And this, last and first photo, shows how big they were in proportion to my feet before I started the fulling process. I love the not knowing part, the excitement and anticipation that's all part of projects like these.

Now I'm ready for winter. Which is only 3 months away...

:)

Lisa

Thursday, July 16, 2009

No, I really do still make small stuff, too....

I've been knitting a little over the past month since school let out. I started with these socks just around exam time - they're going to take a while. I'm actually further along on them than the photo records as I would work on them during breaks at work. I was calling them my 'grad socks', but I think they're more like my 'lunch break socks'.


While DH was away on a five day motorcycle trip over the Canada Day week, I knit a skirt:


And before that, I tried my hand at knitting a shrug:


Right now I'm working on these slippers (they'll be fulled down to size) using the leftover wool from the sweater I finally finished for DH. I put the book in there for size reference. These badboys are knit on 7mm needles - I feel like I'm knitting with cordwood!


My main project, though, has been this little 3/4 length sleeve cardigan. I really started the slippers as a break from the seed stitch (don't enjoy doing it, but love the way it looks once done). I'm in love with the colour, and with the texture of this particular knitted fabric. It's knit top down based on this pattern. I've made quite a few mods, though, and will probably pick out the cast on row at the neckline and do something different there. We'll see, I haven't decided.


What do they say...idle hands are the devil's..what? Idle hands don't get sore? Idle hands still have nice fingernails? Hm.
I just can't remember.
:)
Lisa

Wednesday, July 15, 2009

Pole Barn action....


(Please note, these photos are all out of order - blogger and I are disagreeing about things this morning)


Because we just don't have enough to do inside on our house, we thought we'd build a pole barn. Well, DH actually wanted to build it, and last year.


In order to build a pole barn, you need several things: a shovel, level, a chainsaw, a tractor, logs that you cut the year before, gigantic bolts, adoring fans, ready help, a good head for problem solving, and a lot of brute strength.


Optional things to have include:
a chair, a stack of wood to build the barn around, a drawknife and a beer.


We've been having the most amazing loads of firewood delivered. It's salvaged from an area that I wrote about here. The logs are huge, some a little burned, and all 2 years seasoned.


What you cannot see from the photos here are all the times spent, with DH and I sitting, looking at this - trying to figure out how to get the big*** tractor between the two buildings in a way that would not damage anything, that would be reasonably easy to navigate, that we'd be able to get it out again (I say 'we' but the tractor is driven by 'he'. I've not learned that particular trick yet).

DH built the front side with a bit of help (I emphasize 'BIT') from me on Sunday, then half of the back on his own on Monday. Apparently we started at the toughest corner to negotiate...a good thing, I guess, as everything after that is more straightforward.

DH dug the holes by hand, and we placed each of the poles in their posthole by hand... sounds easy, right? DH had the herculean job of lifting the log, and I had the job of guiding the end into the posthole (without allowing the hole to be filled by bumping the log against the sides too much). I felt VERY left-footed about the whole thing. I know there are places in my life where I have strengths, but this is not one of them!

Funny - although the photos didn't come out in the order I wanted, one thing did work. The photo I wanted to end with is here at the end:


:)
Lisa